Tuesday, September 29, 2009

Death Becomes Her

This tutorial was written by Ivory on 09/29/2009
Do not copy this tutorial and post through any kind of group or claim it as your own. Resemblance to any other tutorial is strictly coincidental.

You will need a tube of your choice.

I am using the Poser art of Angie which is available HERE

Font of your choice
Scrapkit I used is True Blood By Missy Lynn Scraps and can be purchased HERE

I used this Mask(Just right click and save in your mask folder)

1.Open a new image 500x500 white

2.Open one of the papers in the kit and resize 80%

3.Paste as a new layer on your white

4.Load mask (I have fit to canvas checked) in supplies or one of your choice
and merge group

5.Move down and Add drop shadow

6.Openone of the doodles and resize 60%

7.Paste as new layer and add drop shadow

8.Move up

9.Open the coffin and resize 40%

10.Paste as new layer and add drop shadow

11.Move to the right

12.Open your tube and resize if necessary

13.Paste as new layer and add drop shadow

14.Move to the left

15.Open flower 7 and resize 50%

16.Paste as new layer and add drop shadow

17.Move to the base of the tube and left

18.Duplicate and mirror

19.Open swag and resize 70%

20.Paste as new layer and add drop shadow

21.Move this layer below flower layers

22.Highlight top layer

23.Open flower1 and resize 30%

24.Paste as new layer and add drop shadow

25.Place on coffin

26.Add copyright and watermark

27.Add your name

28.You can merge visible


Hope you enjoyed my tutorial

Rose Red

This tutorial was written by Ivory on 09/29/2009
Do not copy this tutorial and post through any kind of group or claim it as your own. Resemblance to any other tutorial is strictly coincidental.

You will need a tube of your choice.

I am using the Poser art of Jo which is available HERE

Font of your choice
Scrapkit I used is True Blood By Missy Lynn Scraps and can be purchased HERE

I used this Mask(Just right click and save in your mask folder)

1.Open a new image 500x500 white

2.Open one of the papers in the kit and resize 80%

3.Paste as a new layer on your white

4.Load mask (I have fit to canvas checked) in supplies or one of your choice and merge group

5.Add drop shadow

6.Open the ribbon frame and resize 60%

7.Paste as new layer

8.Free rotate 90 to the right

9.Click on your magic wand and click inside the frame

10.Expand by 4

11.Open your tube and resize if necessary

12.Paste as new layer

13.Invert/delete/select none

14.Add drop shadow

15.Move tube layer below frame layer

16.Highlight frame layer

17.Add drop shadow

18.Merge frame layer down with tube layer

19.Highlight mask layer

20.Open doodle one and resize 70%

21.Paste as new layer and add drop shadow

22.Move to the left

23.Duplicate and mirror

24.Highlight top layer

25.Open flower 10 and resize 20%

26.Paste as new layer and add drop shadow

27.Move to the bow of the frame

28.Open bow 9 and resize 60%

29.Paste as new layer and add drop shadow

30.Move to bottom of tag

31.Add copyright and watermark

32.Add your name

33.You can merge visible


Hope you enjoyed my tutorial

Wicked

This tutorial was written by Ivory on 09/29/2009
Do not copy this tutorial and post through any kind of group or claim it as your own. Resemblance to any other tutorial is strictly coincidental.

You will need a tube of your choice.

I am using the Poser art of Angie which is available HERE

Font of your choice
Scrapkit I used is Wicked By Creationz By Jo and can be purchased HERE

I used this Mask(Just right click and save in your mask folder)
1.Open a new image 500x500 white

2.Open one of the papers in the kit and resize 70%

3.Paste as a new layer on your white

4.Load mask (I have fit to canvas checked) in supplies or one of your choice and merge group

5.Add drop shadow

6.Open one of the trees and resize 45%

7.Paste as new layer and add drop shadow

8.Move to the right

9.Open the moon and resize 40%

10.Paste as new layer and add drop shadow

11.Move to the top left

12.Open one of the crows and resize 20%

13.Paste as new layer and add drop shadow

14.Place on one of the branches

15.Open one of the spiders and resize 40%

16.Paste as new layer and add drop shadow

17.Place at the base of the tree

18.Open your tube and resize if necessary

19.Paste as new layer and add drop shadow

20.Add copyright and watermark

21.Add your name

22.You can merge visible


Hope you enjoyed my tutorial


Monday, September 28, 2009

Purple Rain

This tutorial was written by Ivory on 09/28/2009
Do not copy this tutorial and post through any kind of group or claim it as your own. Resemblance to any other tutorial is strictly coincidental.

You will need a tube of your choice.

I am using the Poser art of Angie which is available HERE

Font of your choice
Scrapkit I used is Purple Rain By Debs Design and can be purchased HERE

I used this Mask(Just right click and save in your mask folder)

1.Open a new image 500x500 white

2.Open one of the papers in the kit and resize 70%

3.Paste as a new layer on your white

4.Load mask (I have fit to canvas checked) in supplies or one of your choice and merge group

5.Move down and Add drop shadow

6.Open one of the trees and resize 60%

7.Paste as new layer and add drop shadow

8.Move to the right

9.Open one of the raindrop dangles and resize 60%

10.Paste as new layer and add drop shadow

11.Move to the left of the mask

12.Open one of the bows and resize 10%

13.Paste as new layer and add drop shadow

14.Duplicate a few times and place round your tag

15.Open one of the raindrops and resize 20%

16.Paste as new layer and add drop shadow

17.Duplicate several times and place around your tag

18.Open one of the butterflys and resize 10%

19.Paste as new layer and add drop shadow

20.Move to one of the flowers on the tree

21.Open your tube and resize if necessary

22.Paste as new layer and add drop shadow

23.Add copyright and watermark

24.Add your name

25.You can merge visible


Hope you enjoyed my tutorial

Boo

This tutorial was written by Ivory on 09/28/2009
Do not copy this tutorial and post through any kind of group or claim it as your own. Resemblance to any other tutorial is strictly coincidental.

You will need a tube of your choice.

I am using the Poser art of Angie which is available HERE

Font of your choice
Scrapkit I used is A Lil Witch O Gold By Designs By Stina and can be purchased
HERE

I used this Mask(Just right click and save in your mask folder)
1.Open a new image 500x500 white

2.Open one of the papers in the kit and resize 70%

3.Paste as a new layer on your white

4.Load mask (I have fit to canvas checked) in supplies or one of your choice
and merge group

5.Add drop shadow

6.Open one of the round frames and resize 60%

7.Paste as new layer and add drop shadow

8.Open your tube and resize if necessary

9.Paste as new layer

10.Using your freehand selection tool, cut away the bottom part of the tube so
its not overlapping the base of the frame

11.Add drop shadow

12.Open one of the flowers and resize 5%

13.Paste as new layer and add drop shadow

14.Duplicate a couple of times and make a cluster in the bottom left of the
frame

15.Open pumpkin cluster and resize 40%

16.Paste as new layer and add drop shadow

17.Move to the flower cluster

18.Open one of the spiderwebs and resize 20%

19.Paste as new layer and add drop shadow

20.Move to the bottom right of the frame

21.Open One of the word art and resize 20%

22.Paste as new layer and add drop shadow

23.Place over pumpkin cluster

24.Add copyright and watermark

25.Add your name

26.You can merge visible


Hope you enjoyed my tutorial


Wednesday, September 23, 2009

Private Eye

This tutorial was written by Ivory on 09/23/2009
Do not copy this tutorial and post through any kind of group or claim it as your own. Resemblance to any other tutorial is strictly coincidental.

You will need a tube of your choice.

I am using the Poser art of Julia which is available HERE

Font of your choice
Scrapkit I used is Private I By GF Designs and can be purchased HERE

I used this Mask(Just right click and save in your mask folder)

1.Open a new image 500x500 white

2.Open one of the papers in the kit and resize 70%

3.Paste as a new layer on your white

4.Load mask (I have fit to canvas checked) in supplies or one of your choice and merge group

5.Add drop shadow

6.Open torn page and resize 20%

7.Paste as new layer and add drop shadow

8.Move to top left of mask

9.OPen one of the newspaper pages and resize 20%

10.Paste as new layer and add drop shadow

11.Move to torn paper

12.Open magnifying glass and resize 10%

13.Paste as new layer and add drop shadow

14.Move to newspaper

15.Open one of the word art and resize 20%

16.Paste as new layer and add drop shadow

17.Move to top right of mask

18.Open the fingerprint and resize 6%

19.Paste as new layer and add drop shadow

20.Duplicate several times and place around your tag

21.Open footprint and resize 10%

22.Paste as new layer and add drop shadow

23.Move to bottom right

24.Open your tube and resize if necessary

25.Paste as new layer and add drop shadow

26.Open one of the word art and resize 20%

27.Paste as new layer and add drop shadow

28.Move down to the bottom of the tag

26.Add copyright and watermark

27.Add your name

28.You can merge visible


Hope you enjoyed my tutorial

Tuesday, September 22, 2009

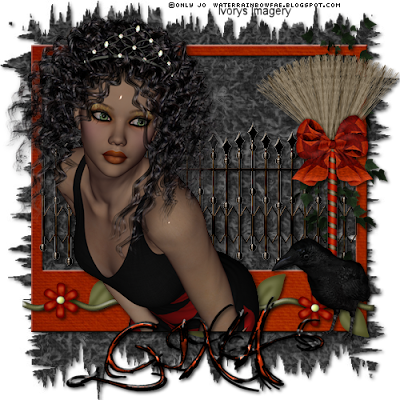
Raven Hair

This tutorial was written by Ivory on 09/22/2009Do not copy this tutorial and post through any kind of group or claim it as your own. Resemblance to any other tutorial is strictly coincidental.

You will need a tube of your choice.

I am using the Poser art of Only Jo which is available HERE

Font of your choice
Scrapkit I used is Witchypoo By KiKeKa Kits and can be purchased HERE

I used this Mask(Just right click and save in your mask folder)

1.Open a new image 500x500 white

2.Open one of the papers in the kit and resize 70%

3.Paste as a new layer on your white

4.Load mask (I have fit to canvas checked) in supplies or one of your choice and merge group

5.Add drop shadow

6.Open one of the frames and resize 60%

7.Paste as new layer and add drop shadow

8.OPen the fence and resize 50%

9.Paste as new layer and add drop shadow

10.Move to inside the frame

11.Open one of the flower strings and resize 55%

12.Paste as new layer and add drop shadow

13.Move to the bottom of the frame

14.OPen one of the ivy and resize 45%

15.Paste as new layer and add drop shadow

16.Move to the right

17.Open one of the brooms and resize 50%

18.Paste as new layer and add drop shadow

19.Move over to the right

20.Open one of the crows and resize 40%

21.Paste as new layer and add drop shadow

22.Move to the bottom right

23.Open your tube and resize if necessary

24.Paste as new layer and add drop shadow

25.Add copyright and watermark

26.Add your name

27.You can merge visible


Hope you enjoyed my tutorial

Witch Dance

This tutorial was written by Ivory on 09/22/2009
Do not copy this tutorial and post through any kind of group or claim it as your own. Resemblance to any other tutorial is strictly coincidental.

You will need a tube of your choice.

I am using the Poser art of Angie which is available HERE

Font of your choice
Scrapkit I used is Witchypoo By KiKeKa Kits and can be purchased HERE

I used this Mask(Just right click and save in your mask folder)

1.Open a new image 500x500 white

2.Open one of the papers in the kit and resize 70%

3.Paste as a new layer on your white

4.Load mask (I have fit to canvas checked) in supplies or one of your choice and merge group

5.Add drop shadow

6.Open one of the bats and resize 40%

7.Paste as new layer and add drop shadow

8.Move to the top right

9.Open one of the ivy and resize 60%

10.Paste as new layer and add drop shadow

11.Move to the right

12.Open the cauldron and resize 40%

13.Paste as new layer and add drop shadow

14.Move to the bottom right

15.Open the grass and resize 70%

16.Paste as new layer and add drop shadow

17.Move to the right

18.Move grass layer below cauldron layer

19.Open one of the leaves and resize 30%

20.Paste as new layer and add drop shadow

21.Duplicate several times and place around your tag

22.Open your tube and resize if necessary

23.Paste as new layer and add drop shadow

24.Add copyright and watermark

25.Add your name

26.You can merge visible


Hope you enjoyed my tutorial

Joy Of Hope

This tutorial was written by Ivory on 09/22/2009
Do not copy this tutorial and post through any kind of group or claim it as your own. Resemblance to any other tutorial is strictly coincidental.

You will need a tube of your choice.

I am using the Poser art of Angie which is available HERE

Font of your choice
Scrapkit I used is Joy Of Hope By Classie Creationz and can be purchased HERE

I used this Mask(Just right click and save in your mask folder)

1.Open a new image 500x500 white

2.Open one of the papers in the kit and resize 70%

3.Paste as a new layer on your white

4.Load mask (I have fit to canvas checked) in supplies or one of your choice and merge group

5.Add drop shadow

6.Open the doodle

7.Paste as new layer and add drop shadow

8.Move to the bottom right

9.Duplicate and mirror

10.Open the flower bling and resize 75%

11.Paste as new layer and add drop shadow

12.Move up

13.Open one of the curled ribbons and resize 50%

14.Paste as new layer and add drop shadow

15.Move down to the doodles

16.Open one of the sunflowers and resize 10%

17.Paste as new layer and add drop shadow

18.Duplicate several times and place around your tag

19.Open one of the crystal stars and resize 40%

20.Paste as new layer and add drop shadow

21.Duplicate several times and place around your tag

22.Open your tube and resize if necessary

23.Paste as new layer and add drop shadow

24.Add copyright and watermark

25.Add your name

26.You can merge visible


Hope you enjoyed my tutorial

Saturday, September 19, 2009

Rogue

This tutorial was written by Ivory on 09/19/2009
Do not copy this tutorial and post through any kind of group or claim it as your own. Resemblance to any other tutorial is strictly coincidental.

You will need a tube of your choice.

I am using the Poser art of deziningdiva which is available HERE

Font of your choice
Scrapkit I used is Butterfly Passion By Sametra Designs and can be purchased
HERE

I used this Mask(Just right click and save in your mask folder)

1.Open a new image 500x500 white

2.Open one of the papers in the kit and resize 70%

3.Paste as a new layer on your white

4.Load mask (I have fit to canvas checked) in supplies or one of your choice
and merge group

5.Add drop shadow

6.Open one of the bows and resize 30%

7.Paste as new layer and add drop shadow

8.Place on one of the big stars in the mask

9.Duplicate and place one on each of the big stars

10.Open one of the buttons and resize 20%

11.Paste as new layer and add drop shadow

12.Duplicate and place one on each of the next size down stars of the mask

13.Open one of the flowers and resize 10%

14.Paste as new layer and add drop shadow

15.Duplicate several times and place around your tag

16.Open one of the butterflys and resize 10%

17.Paste as new layer and add drop shadow

18.Place on one of the flowers at the top

19.Duplicate and mirror and move to one of the flowers

20.Open one of the circle frames and resize 85%

21.Paste as new layer and add drop shadow

22.Move layer down to below mask layer

23.Open your tube and resize if necessary

24.Paste as new layer and add drop shadow

25.Add copyright and watermark

26.Add your name

27.You can merge visible


Hope you enjoyed my tutorial

Tuesday, September 15, 2009

Skater Gurl

This tutorial was written by Ivory on 09/15/2009
Do not copy this tutorial and post through any kind of group or claim it as your own. Resemblance to any other tutorial is strictly coincidental.

You will need a tube of your choice.

I am using the art of Keith Garvey which is available HERE

Font of your choice
Scrapkit I used is Madness By Rieneke Designs and can be purchased HERE

I used this Mask(Just right click and save in your mask folder)

1.Open a new image 500x500 white

2.Open one of the papers in the kit and resize 70%

3.Paste as a new layer on your white

4.Load mask (I have fit to canvas checked) in supplies or one of your choice
and merge group

5.Add drop shadow

6.Move down a little

7.Open one of the bead scatters and resize 80%

8.Paste as new layer and add drop shadow

9.Move to the left

10.Duplicate and mirror

11.Open one of the flower stems and resize 60%

12.Paste as new layer and add drop shadow

13.Move to the right

14.Open one of the heart pendants and resize 50%

15.Paste as new layer and add drop shadow

16.Move to the left

17.Open one of the flowers and resize 10%

18.Paste as new layer and add drop shadow

19.Duplicate a few times and place around your tag

20.Open one of the butterflys and resize 20%

21.Paste as new layer and add drop shadow

22.Move to one of the flowers

23.Open one of the ruffled ribbons and resize 35%

24.Paste as new layer and add drop shadow

25.Move down to the bottom of the tag

26.Open your tube and resize if necessary

27.Paste as new layer and add drop shadow

28.Move this layer down below ruffle layer

29.Add copyright and watermark

30.Add your name

31.You can merge visible


Hope you enjoyed my tutorial

Autumn Love

This tutorial was written by Ivory on 09/15/2009
Do not copy this tutorial and post through any kind of group or claim it as your own. Resemblance to any other tutorial is strictly coincidental.

You will need a tube of your choice.
I am using A personal Graphic

Font of your choice
Scrapkit I used is Autumn Lovin By Kirsty's Scraps and can be purchased HERE

I used this Mask(Just right click and save in your mask folder)
1.Open a new image 500x500 white

2.Open one of the papers in the kit and resize 70%

3.Paste as a new layer on your white

4.Load mask (I have fit to canvas checked) in supplies or one of your choice
and merge group

5.Add drop shadow

6.Lower opacity to 60

7.Open one of the frames and resize 75%

8.Paste as new layer

9.Select magic wand and click inside frame

10.Select/modify/expand by 3

11.Open your image and resize if necessary

12.Paste as new layer

13.Invert/delete/select none

14.Highlight frame layer and add drop shadow

15.Move graphic layer below frame layer

16.Highlight frame layer and merge down

17.Open the vine and resize 90%

18.Paste as new layer and add drop shadow

19.Move to the left and up a little

20.Open leaves 3 and resize 85%

21.Paste as new layer and add drop shadow

22.Free rotate 90 to the right

23.Move to the left

24.Open the mushroom and resize 40%

25.Paste as new layer and add drop shadow

26.Move to the bottom left ( not too far down)

27.Open heart 2 and resize 60%

28.Paste as new layer and add drop shadow

29.Move to the left

30.Open ribbon 5 and reszie 30%

31.Paste as new layer and add drop shadow

32.Move to the base of your cluster on the left

33.Add copyright and watermark

34.Add your name

35.You can merge visible


Hope you enjoyed my tutorial


Monday, September 14, 2009

Lil Bit Orange

This tutorial was written by Ivory on 09/11/2009
Do not copy this tutorial and post through any kind of group or claim it as your own. Resemblance to any other tutorial is strictly coincidental.

You will need a tube of your choice.
I am using the Poser art of Angie which is available HERE

Font of your choice
Scrapkit I used is A Lil Bit Geo By This and That by Tammy and can be purchased HERE

I used this Mask(Just right click and save in your mask folder)

1.Open a new image 500x500 white

2.Open one of the papers in the kit and resize 70%

3.Paste as a new layer on your white

4.Load mask (I have fit to canvas checked) in supplies or one of your choice and merge group

5.Add drop shadow

6.Open flower 1 and resize 40%

7.Paste as new layer and add drop shadow

8.Move to the left

9.Duplicate and mirror

10.Move to the right and up a little

11.Open one of the flowers and resize 10%

12.Paste as new layer and add drop shadow

13.Duplicate a few times and place around your tag

14.Open one of the bows and resize 10%

15.Paste as new layer and add drop shadow

16.Duplicate a few times and place around your tag

17.Open your tube and resize if necessary

18.Paste as new layer and add drop shadow

19.Add copyright and watermark

20.Add your name

21.You can merge visible


Hope you enjoyed my tutorial

Lil Bit Blue

This tutorial was written by Ivory on 09/11/2009
Do not copy this tutorial and post through any kind of group or claim it as your own. Resemblance to any other tutorial is strictly coincidental.

You will need a tube of your choice.
I am using the Poser art of Angie which is available HERE

Font of your choice
Scrapkit I used is A Lil Bit Geo By This and That by Tammy and can be purchased HERE

I used this Mask(Just right click and save in your mask folder)
.Open a new image 500x500 white

2.Open one of the papers in the kit and resize 70%

3.Paste as a new layer on your white

4.Load mask (I have fit to canvas checked) in supplies or one of your choice and merge group

5.Add drop shadow

6.Open frame 3 and resize 50%

7.Paste as new layer and add drop shadow

8.Open one of the flowers and resize 10%

9.Paste as new layer and add drop shadow

10.Duplicate twice so you have 3

11.Place them in the top 3 sections of the frame (see my tag)

12.Open one of the bows and resize 10%

13.Paste as new layer and add drop shadow

14.Move to just below middle flower

15.Open one of the flowers and resize 5%

16.Paste as new layer and add drop shadow

17.Duplicate a few times and place around your tag

18.Open your tube and resize if necessary

19.Paste as new layer and add drop shadow

20.Add copyright and watermark

21.Add your name

22.You can merge visible


Hope you enjoyed my tutorial


Saturday, September 12, 2009

Fallen Flowers


This tutorial was written by Ivory on 09/12/2009
Do not copy this tutorial and post through any kind of group or claim it as your own. Resemblance to any other tutorial is strictly coincidental.

You will need a tube of your choice.
I am using the Poser art of Only Jo which is available HERE

Font of your choice
Scrapkit I used is Fall Splender By DezinersUtopia and can be purchased HERE


1.Open a new image 500x500 white

2.Open one of the bracket pads and resize 85%

3.Paste as a new layer on your white

4.Add drop shadow

5.Open one of the doodle art and resize 95%

6.Paste as new layer and add drop shadow

7.Move up

8.Open the flower row and resize 90%

9.Paste as new layer and add drop shadow

10.Flip and move to the bottom

11.Open one of the tags and resize 60%

12.Paste as new layer and add drop shadow

13.Move to top right

14.Open one of the buttons and resize 20%

15.Paste as new layer and add drop shadow

16.Move to the top of the tag over the hole

17.Open the snail and resize 20%

18.Paste as new layer and add drop shadow

19.Move to the bottom of the tag

20.Open your tube and resize if necessary

21.Paste as new layer and add drop shadow

22.Move down

23.Add copyright and watermark

24.Add your name

25.You can merge visible


Hope you enjoyed my tutorial

Calla Beauty

This tutorial was written by Ivory on 09/11/2009
Do not copy this tutorial and post through any kind of group or claim it as your own. Resemblance to any other tutorial is strictly coincidental.

You will need a tube of your choice.
I am using the Poser art of Only Jo which is available HERE

Font of your choice
Scrapkit I used is Green Meadows By Krissy Scraps and can be purchased HERE

I used this Mask(Just right click and save in your mask folder)

1.Open a new image 500x500 white

2.Open one of the papers in the kit and resize 70%

3.Paste as a new layer on your white

4.Load mask (I have fit to canvas checked) in supplies or one of your choice and merge group

5.Reduce opacity to about 80

6.Open clip frame and resize 50%

7.Paste as new layer

8.Click on your magic wand and click inside the frame

9.Selections/modify/expand by 5

10.Open your tube and resize if necessary

11.Paste as new layer

12.Invert/ delete/ select none

13.Add drop shadow to your tube layer

14.Highlight frame layer and add drop shadow

15.Move tube layer down below frame layer

16.Highlight frame layer and merge down

17.Open one of the physalis and resize 70%

18.Paste as new layer and add drop shadow

19.Move to the left

20.Open one of the calla lilies and resize 85%

21.Paste as new layer and add drop shadow

22.Move to the left

23.Open one of the double bows and resize 40%

24.Paste as new layer and add drop shadow

25.Move to the stems of the flowers

26.Open one of the gems and resize 10%

27.Paste as new layer and add drop shadow

28.Move to top right of the frame

29.Duplicate and place this one at the bottom right

30.Add copyright and watermark

31.Add your name

32.You can merge visible


Hope you enjoyed my tutorial

Lotus

This tutorial was written by Ivory on 09/12/2009
Do not copy this tutorial and post through any kind of group or claim it as your own. Resemblance to any other tutorial is strictly coincidental.

You will need a tube of your choice.
I am using the Poser art of Only Jo which is available HERE

Font of your choice
Scrapkit I used is Lotus Blossom By Scrappy Redhead and can be purchased HERE

I used this Mask(Just right click and save in your mask folder)

1.Open a new image 500x500 white

2.Open one of the papers in the kit and resize 80%

3.Paste as a new layer on your white

4.Load mask (I have fit to canvas checked) in supplies or one of your choice and merge group

5.Add Drop shadow

6.Open one of the fans and resize 75%

7.Paste as new layer and add drop shadow

8.Move up

9.Open pearl necklace and resize 10%

10.Paste as new layer and add drop shadow

11.Open one of the flowers and resize 20%

12.Paste as new layer and add drop shadow

13.Duplicate several times and place around your tag

14.Open the little bow and resize 20%

15.Paste as new layer and add drop shadow

16.Duplicate a few times and place around your tag

17.Open your tube and resize if necessary

18.Paste as new layer and add drop shadow

19.Add copyright and watermark

20.Add your name

21.You can merge visible


Hope you enjoyed my tutorial

Tuesday, September 8, 2009

Breeze

This tutorial was written by Ivory on 09/08/2009
Do not copy this tutorial and post through any kind of group or claim it as your own. Resemblance to any other tutorial is strictly coincidental.

You will need a tube of your choice.
I am using the Poser art of Angie which is available HERE

Font of your choice
Scrapkit I used is Breeze By Rieneke and can be purchased HERE

I used this Mask(Just right click and save in your mask folder)

1.Open a new image 500x500 white

2.Open one of the papers in the kit and resize 70%

3.Paste as a new layer on your white

4.Load mask (I have fit to canvas checked) in supplies or one of your choice and merge group

5.Add drop shadow

6.Open flower 8

7.Paste as new layer add drop shadow

8.Place top right

9.Duplicate and mirror

10.Open flower 12 and resize 20%

11.Paste as new layer add drop shadow

12.Place on the edge of the mask

13.Duplicate several times and place at intervals around the mask edge

14.Open knot 4 and resize 20%

15.Paste as new layer and add drop shadow

16.Move to the right between the flowers

17.Duplicate and mirror

18.OPen flower 5 and resize 20%

19.Paste as new layer and add drop shadow

20.Place to the right

21.Duplicate this layer and mirror

22.Open your tube and resize if necessary

23.Paste as new layer and add drop shadow

24.Add copyright and watermark

25.Add your name

26.You can merge visible


Hope you enjoyed my tutorial
Fall Face

This tutorial was written by Ivory on 09/08/2009
Do not copy this tutorial and post through any kind of group or claim it as your own. Resemblance to any other tutorial is strictly coincidental.

You will need a tube of your choice.
I am using the Poser art of Jo which is available HERE

Font of your choice
Scrapkit I used is Beautiful Autumn By Cays Creation and can be purchased HERE

I used this Mask(Just right click and save in your mask folder)

1.Open a new image 500x500 white

2.Open one of the papers in the kit and resize 14%

3.Paste as a new layer on your white

4.Load mask (I have fit to canvas checked) in supplies or one of your choice and merge group

5.Add drop shadow

6.Open element14 and resize 16%

7.Paste as new layer

8.Using your magic wand click inside the frame

9.Selections/expand by 5

10.Open your tube and resize if necessary

11.Paste as new layer

12.Invert/ delete/select none

13.Move tube layer down below frame layer

14.Highlight frame layer and add drop shadow

15.Merge frame layer down with tube layer

16.Open element 56 and resize 15%

17.Paste as new layer and add drop shadow

18.Move to the top right

19.Move this layer below frame layer

20.Duplicate and mirror

21.Duplicate this layer and flip

22.Duplicate this layer and mirror

23.Open element 55 and resize 15%

24.Paste as new layer and add drop shadow

25.Move to the right and up a little

26.Highlight top layer

27.Open element 21 and resize 14%

28.Paste as new layer

29.Centralise it a little round the frame

30.Add copyright and watermark

31.Add your name

32.You can merge visible


Hope you enjoyed my tutorial

Fall Dance

This tutorial was written by Ivory on 09/08/2009
Do not copy this tutorial and post through any kind of group or claim it as your own. Resemblance to any other tutorial is strictly coincidental.

You will need a tube of your choice.
I am using the Poser art of Jo which is available HERE

Font of your choice
Scrapkit I used is Beautiful Autumn By Cays Creation and can be purchased HERE

I used this Mask(Just right click and save in your mask folder)

1.Open a new image 500x500 white

2.Open one of the papers in the kit and resize 14%

3.Paste as a new layer on your white

4.Load mask (I have fit to canvas checked) in supplies or one of your choice and merge group

5.Add drop shadow

6.Open element56 and resize 20%

7.Paste as new layer and add drop shadow

8.OPen element 7 and resize 20%

9.Paste as new layer and add drop shadow

10.Move to the bottom of the tag

11.Open element 5 and resize 3%

12.Paste as new layer and add drop shadow

13.Duplicate several times and place around your tag

14.Open element 3 and resize 8%

15.Paste as new layer and add drop shadow

16.Duplicate several times and place around your tag

17.Open your tube and resize if necessary

18.Paste as new layer and add drop shadow

19.Add copyright and watermark

20.Add your name

21.You can merge visible


Hope you enjoyed my tutorial

Sunday, September 6, 2009

Dream A Little Dream

This tutorial was written by Ivory on 09/06/2009
Do not copy this tutorial and post through any kind of group or claim it as your own. Resemblance to any other tutorial is strictly coincidental.

You will need a tube of your choice.
I am using the Poser art of Angie which is available HERE

Font of your choice
Scrapkit I used is Dream A Little Dream By Schnegge and can be purchased HERE

I used this Mask(Just right click and save in your mask folder)

1.Open a new image 500x500 white

2.Open one of the papers in the kit and resize 80%

3.Paste as a new layer on your white

4.Load mask (I have fit to canvas checked) in supplies or one of your choice and merge group

5.Add drop shadow

6.Open doodle 4

7.Paste as new layer and add drop shadow

8.Open flower 4

9.Paste as new layer and add drop shadow

10.Move to the right

11.Open string 1

12.Paste as new layer and add drop shadow

13.Move to the left

14.Open butterfly 3 and resize 40%

15.Paste as new layer and add drop shadow

16.Move to the flowers

17.Open one of the gems and resize 10%

18.Paste as new layer and add drop shadow

19.Duplicate several times and place around your tag

20.Open flower 12 and resize 10%

21.Paste as new layer and add drop shadow

22.Duplicate several times and place around your tag

23.Open your tube and resize if necessary

24.Paste as new layer and add drop shadow

25.Add copyright and watermark

26.Add your name

27.You can merge visible


Hope you enjoyed my tutorial